


• The ceiling always gets hung first and you install drywall perpendicular to the rafter. If the rafters are running North and South then the drywall will run East and West.
• When fastening drywall horizontally, on the “butts” apply the screws every 6” – 8”. When fastening the rest of the drywall apply screws every 12”, this equates to a screw on the top and bottom, then 3 screws in the field (middle).
• When hanging the drywall vertically, apply screws every 8” – 12” from floor to ceiling.
• The drywall will always get cut to fit between ½” – 1” above the floor. There may be a few exceptions
but they are rare.
• Always stagger your butt joints from row to row, never let them line up.
• Always use the biggest pieces possible, the least amount of seams equates into a lesser amount of
things to go wrong in the future
You begin by measuring for your first sheet of drywall, start on a ceiling in a corner somewhere. I like to do the biggest areas first while I’m still running at 100%, especially on ceilings.
Make a habit of pulling your numbers from the same direction, it will save you time and headache
in the long run. I always pull numbers from my left and go to the right, and I also pull from the top and go down. You can do whatever feels more natural to you, the main point is to find consistency.
When measuring, I like to get all of my vertical numbers first. These would include things like:
• The overall length of the drywall
• Electrical boxes (vertical measurements only)
• Bathtubs (vertical measurements only)
• Doors (vertical measurements only)
• Etc.
Once I have those numbers in hand I get my horizontal measurements which would include the same as above, except the horizontal side. The height of the drywall would be included in this.
If you’re not using Butt Boards then the length of the drywall will always break on the center of a stud.
If you are using Butt Boards then your length will always break in the center of the stud cavity.
When you mark your measuring points on the drywall make sure that you “pull” from the same side that you originally measured from. Like I mentioned above, this part is critical in projecting your
measurements to the drywall consistently.

Mark all of your vertical numbers on the drywall with a line, then expand the line with your T-square and a pencil if needed. Then mark all of your horizontal numbers with a line, then take your chalk box and snap lines if needed.

Now, with a combination of your keyhole saw, big drywall saw and razor knife, cut the drywall into your desired shape and size.

It’s always best to have 2 people when hanging. One person should be a dedicated “screw off guy”, that title carries a lot of conversation pieces. The other person is the “lead guy” who measures, cuts and helps tack up the drywall.
Sometimes it’s smart to mark your studs first so that when you hang the drywall you can clearly see where to install your screws, especially on the ceiling where you don’t want to waste time stud searching while holding heavy drywall. This equates into “wasted energy”, which you’ll want to minimize for endurance purposes.

If you decide to use glue, squeeze it on the studs in 3/8” beads approximately 40” – 42” long. That will
leave a few inches on each side of the drywall with no glue.
Hang the ceilings first and walls second.
Always stagger your butt joints.
Put your screws in straight, if your screw gun is tilted, the corner of the head will protrude outside of the drywall and create more work for you because they will have to be set deeper or removed and replaced.
When fastening drywall horizontally, on the “butts” apply the screws every 6” – 8”. When fastening the rest of the drywall apply screws every 12”, this equates to a screw on the top and bottom, then 3 screws in the field (middle).

When hanging the drywall vertically, apply screws every 8” – 12” from floor to ceiling.
When hanging drywall with another person try to lift and move the drywall in a synchronous manner. This will reduce what I call “wasted energy”. In other words try not to fight each other with the drywall.
Make sure your seams and “cut outs” are as tight as possible.
Before you get started taping, you need to go back through and check all of your screws. Make sure that all of the misses were removed and the dimples are pushed in. If you see areas that need screws, add them. Also check the screws to make sure that they’re all set to the correct depth. Sometimes screws that are pushed in at an angle will have a corner protruding outside of the drywall paper, those will need to be set deeper or replaced.

Special note: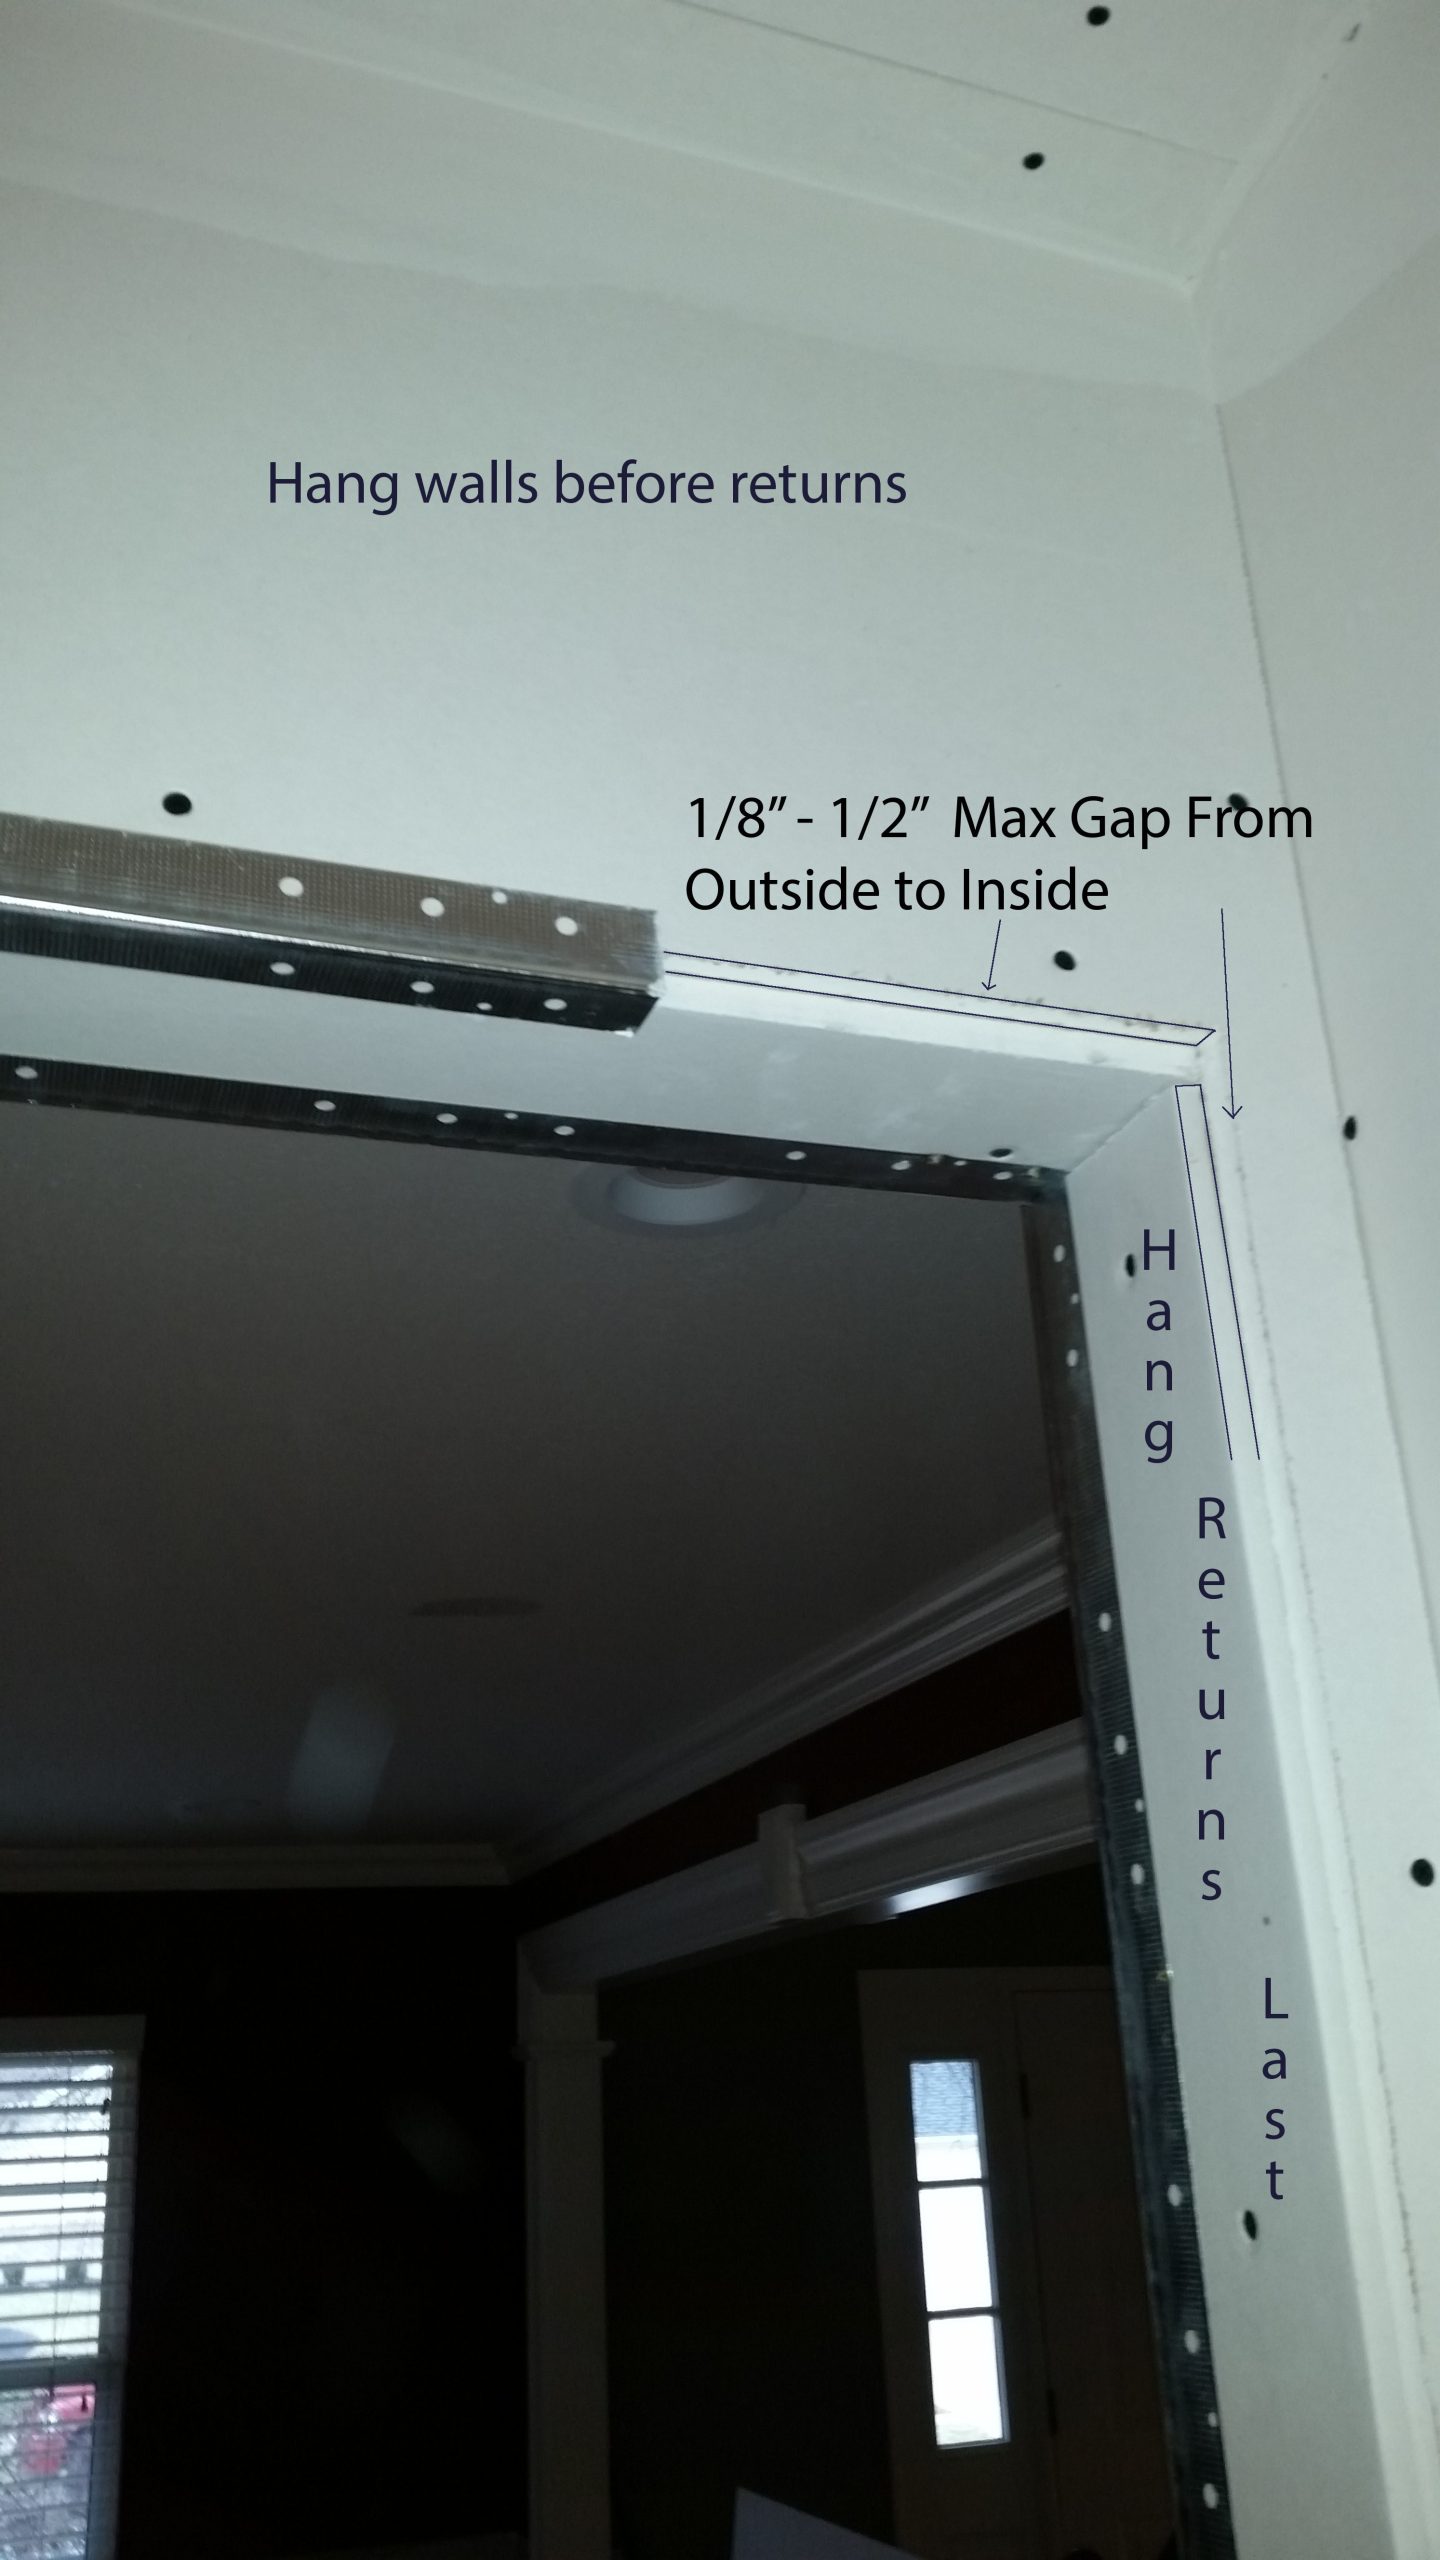
**This note pertains to installing drywall on an outside corner where corner bead will be installed.
Always drywall the walls first and the returns last (returns are the narrow areas). When installing drywall on the returns, make sure the drywall stops at the end of the stud or no further than 3/8” past the stud, do not have the drywall overlap the other side by too much. Your margin of error is up to 3/8”, which is pretty doable.
The reason for this is because installing the corner bead is better when you can push it back/tight a little, this cannot be done if the drywall is completely overlapped.**
When you run across an electrical box or other type of component that will be cut out with your Router make sure that you measure and mark some where that will allow you to find the center point of the component when it is covered up by drywall. Typically, we mark on the drywall next to the box (if it’s already hung) or on the floor, but anywhere will work.
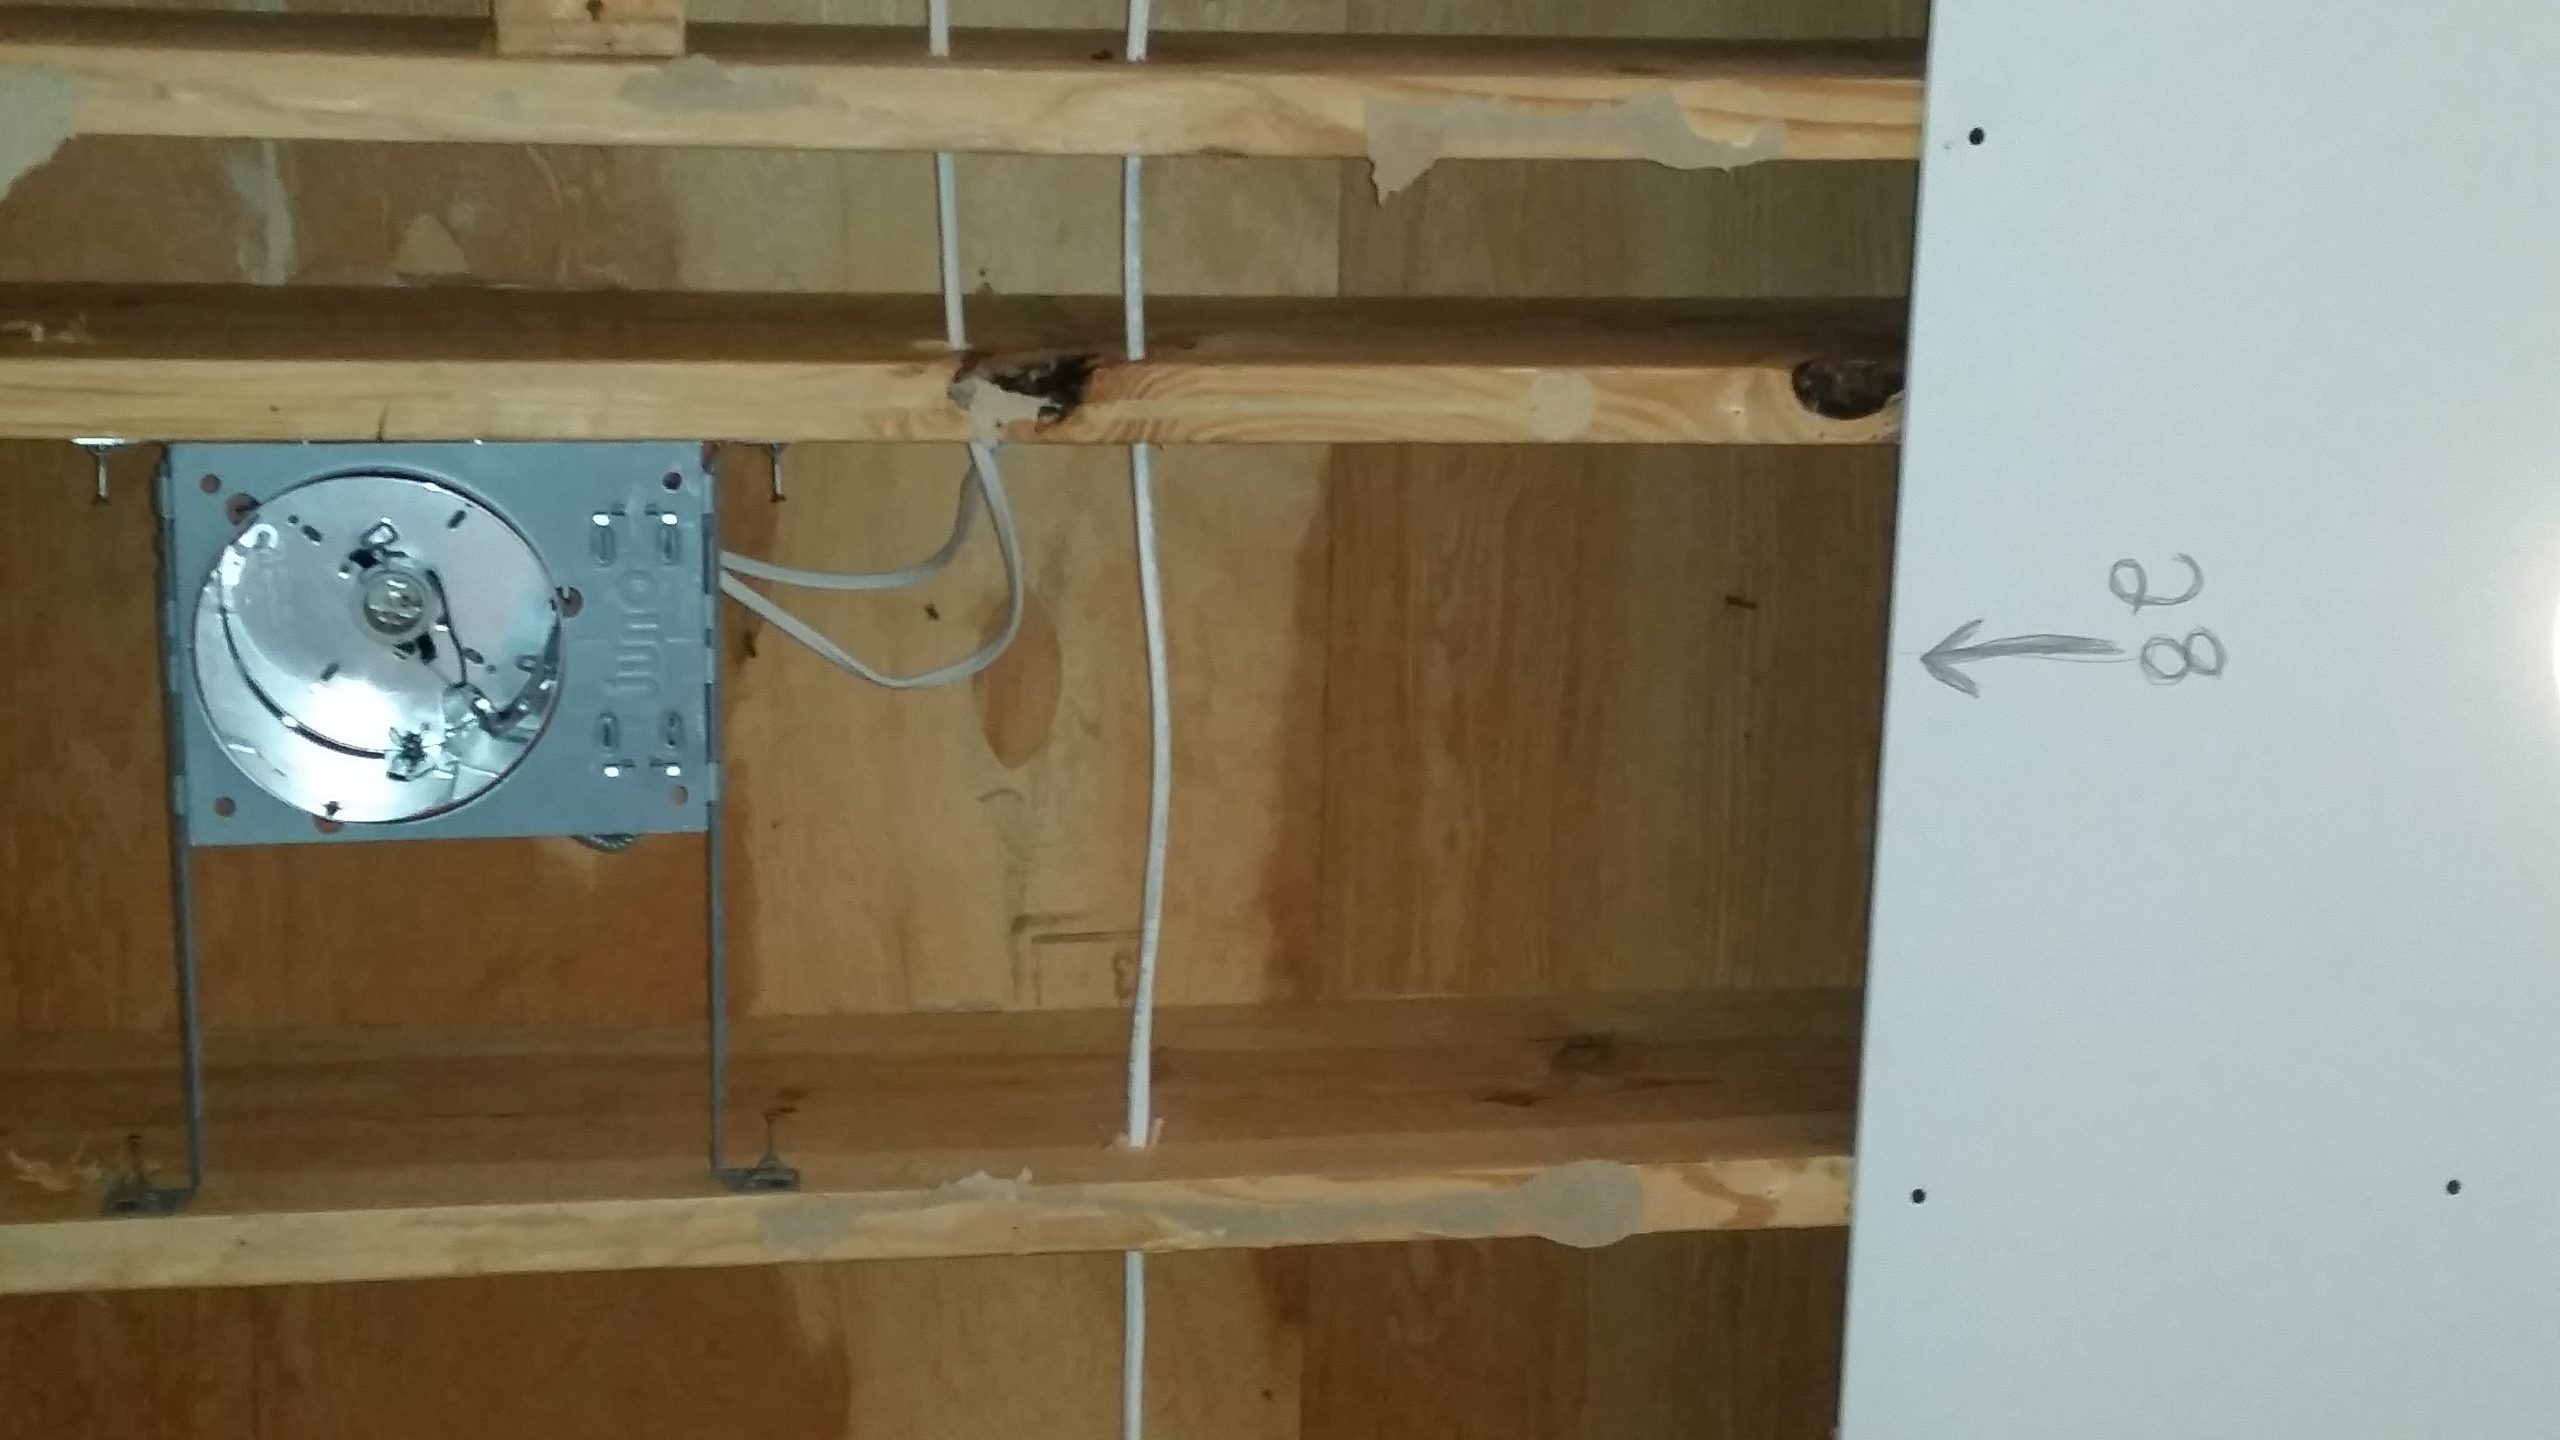
When you have the measurements and are confident that you can cover the box and still find the center point then tack up your sheet of drywall. Do not screw off the entire sheet, actually refrain from putting screws in the proximity of the box until it is cut out or you run the risk of damaging the drywall.

When the drywall is tacked in place, get your measurements and mark the drywall. This mark should be close to the middle of the box. It does not have to be exact, in fact when you get more comfortable with this process you can measure closer to the outside of the box to speed things up a little.

With your drywall marked and your Router in hand, turn it on and insert it onto your mark. Move until you hit the perimeter of your box and make sure to not go too far. Once you hit the perimeter, remove the Router and place it on the outside of the box.

Take your Router counter clockwise full circle (or square) applying a little pressure towards your component as you move.

When your box is cut out you can finish screwing off that sheet of drywall.

Special Notes:
**Corner bead should be cut as tightly as possible without warping it.**
**Be liberal with the staples. Place 1 every 6” – 10”. At end points use 2 or 3 staples.**
**Always apply fiber-mesh tape over the sides of the corner bead to ensure you do not get hair-line cracks in the future. Do not let the tape protrude past the outside corner.**
**This note pertains to easier finishing (mud work). If the corner bead is installed tightly against the drywall it will require less mud which may mean it only takes 2 coats instead of 3. Make sure you do not go too tight or else the metal sides of the corner bead will protrude past the actual corner of the corner bead (hopefully that’s not too
confusing) when running your mud and it will look bad. To test your success here, take your 10” knife and place 1 end on the corner of the corner bead, place the other end on
the drywall. Look at the gap in-between the knife and the drywall. It should be as close to 1/8” as possible, if it is you should be safe with 2 coats of mud. A ¼” gap or more will likely require 3 coats of mud.**

Installation is pretty simple, just measure your areas to the 1/16” and then cut your corner bead with the tin snips. Then set the corner bead onto the outside angle, apply a little pressure in the middle of the corner bead and shoot a staple on both sides of that spot. From this point work your way up or
down with the staples. Just make sure the corner bead is fairly plumb and/or square.
In windows and other areas
You will also run into areas that are longer than the corner bead that you have. In this instance you
will find a scrap piece (or cut off a full stick) and cut it to about 1’. Place this scrap piece under your 2 sticks of corner bead at the seam and staple them off. This will allow the seam to sit evenly without one side protruding over the other.
Tools Needed:
• Mud Pan.
• 6” knife, 8” knife, 10” and 12” knife. Metal is better.
• Banjo (If not hand taping).
• Tape Reel or Tape Dispenser (If not taping with banjo).
• 1/2” Drill for Mixing.
• 1/2” Mud Beater for mixing.
• Drop Lights.
• Pencil (for marking imperfections and other problem areas)
• Fine Grit Sanding Sponges
• Circle, Square or Triangle Pole Sander with 220 Grit Paper (We don’t use pole sanders because I believe a lot of imperfections get overlooked, however a lot of guys will disagree with me. If you go this route do not use a rectangle pole sander, they dig gouges and flip over which creates more work)

• All-Purpose is by far used on the most percentage of jobs. All-Purpose is only used for the tape coat
because it has extra glue in it that helps bond the tape to the drywall. Because of the glue content these buckets are a lot heavier than your typical lightweight mud. This type of mud also shrinks more and is horrible to sand. Make sure you only use it on the tape coat.
• Light-Weight mud is what we use on the remainder of the job. As the name implies it is lighter. It shrinks less and gets less pock marks (air bubbles). This product is used on the bed coat and finish coat of your seams and corner bead.
• Quick-set type mud comes in different setting times. 5 min, 20 min, 45 min, 90min and 210min. This type of mud is used mainly on drywall repairs and/or filling gaps in-between drywall. It can be mixed up thick enough to fill in larger gaps if needed but remember if the gap is too big you should try to
fill it with drywall first. This mud comes in powder form and has to be mixed on the spot. Make sure you mix up what you can use in the time allotted and nothing more. You mix this up to order, which is to say you can mix it up thin or thick or anywhere in-between. The thicker consistency will set-up quicker and thinner will set-up slower. Warm water will make it set-up faster, sometimes a lot faster so be careful.
**Warning: Quick-set mud will set-up under water, do not put it down drains. We always
mix it up outside in the grass unless we can’t. In that case we use a slop sink or the equivalent
and take extra care to keep the mud out of the drain.**

• Paper tape is used in all new construction jobs for all seams, butt joints, flat joints and angle seams. It can be run by hand, through a banjo or through an automatic taper (bazooka). Most one-timers will either tape by hand or with a banjo (cost is typically $90). A bazooka will cost you about $1000 on the lowest side, which is hard to justify the cost unless you do this type of work all the time.
• Fiber-mesh tape is used mainly on drywall repairs and corner bead. Do not use it on angle seams. If you do use it on your seams, make sure that the first coat of mud is done with a quick-set type and not regular pre-mixed mud. If drywall repairs are being done, fiber-mesh tape and quick-set mud are the best combination of materials to use. This will ensure the best results when taking longevity into consideration.
• Flex-tape is used on “off angles” which basically applies to any angle seam that is not a 90 degree angle. This tape is a bit finicky in that if you “flex” it too much or too little it can be tricky to work with.
This section will cover hand taping since most non-professionals won’t be able to afford the cost of automatic taping tools.

The term “knife check” will be used often through-out the taping process. A knife check is a coined term that is simply the process of taking the bottom of your knife and centering it on the tape and/or seam. You’ll notice that the knife can now “teeter-totter” on the tape and/or seam. Use these
gaps as a guide to see which side needs to be floated out more, less or if they’re the same. You will use this technique multiple times in multiple areas.

You will want to backfill all
A nice tight seam (or backfilled seam) will last a long time. You can either use All-Purpose mud straight out of the bucket or quickset type mud.
The All-Purpose mud will need to completely dry before continuing
This picture to the side has
If there are a lot of gaps or you’re not backfilling until later in the day, go ahead and use All-Purpose, remember not to add water.
It helps to have a bucket or two of clean water. One bucket for adding water into your mud and the other bucket for setting your dirty tools in until you’re ready t
Let’s start by mixing up your mud. Get out your All-Purpose mud and some clean water. The trick here is that you don’t want the mud too thin because it’ll be a mess and very tough to work with. My recommendation is a ½ cup of water to start and then go from there. If you’re taping by hand the mud can be a little thicker. If you’re taping with a banjo then it should be a little thinner.

Always tape your butt joints first, flat joints second and 
When hand taping, apply the mud in 4” – 6” swipes, and run them out as long as you feel comfortable with, the longer the better with-in reason. For example don’t make a 40’ run but at the same time don’t do a bunch of 2’ runs either.
Find your comfort zone and stay there. Then apply the paper tape on top of your mud, try to keep as much slack as possible out of the tape. If you’re applying tape into angle seams, first bend it on the crease and then apply the creased part into the inside of the corner. When hand taping angle seams, after the tape is pushed in by hand I come back with my 6” knife and seat it in the corner while making the crease/line straight (straight-ish) all the way down.


The best way to check for a bulge on a flat seam is to use the “knife check” method. If there is a bulge, either wipe down the mud better or you may need to mix the mud thinner. Butt joints will always have a bulge by nature, it shouldn’t exceed 1/8” or so. When wiping down angle seams, put your 6” blade into the corner and wipe 1 side down all the way, then come back and do the same on the other side. These are tough to mess up. The main thing to do here is make sure the tape is set into the corner really well so that you get a crisp clean line and not a wavy line.

This method gives the same results, except we have a tool that applies the mud to the tape for us. The mud will need to be a little thinner than hand taping thickness, this same rule applies anytime you run mud through machines. Thinner mud may require you to mix up the All- purpose with 1 cup of water to start with instead of the ½ cup of water when running the tape by hand.
Load the banjo with 250’ paper tape first, feed it through the small slit on the outside then snake it up towards the top handle and back down until it goes through the front slit and let a couple inches hang outside. Then load the mud so that the tape is always above the mud (from a side view perspective). You will instantly see the logic behind this tool. Pulling the tape will put pressure on the mud causing it to stick to the tape.

There is typically a “mud flow” adjuster on top of the front slit, tightening will restrict mud flow and loosening will allow for more mud flow. Factory settings will be fine, keep this adjustment in mind
in-case you have some troubleshooting to do later on.
Before you start, remove the excess tape without mud on it and toss it. Next, grab the tape with one hand while the banjo is in the other hand and pull out a 3’-5’ section at a time. You can do more or less depending on your comfort. The more you pull out the faster this step will go.

When you want to stop the tape from coming out simply tilt the banjo to put pressure on the tape. Make continuous runs of tape across the drywall seams, try not to have multiple breaks with the tape on the same seam unless you have to. Just like hand taping, make sure the butt joints get taped first, then the flat joints, then the angle seams.
Try to keep all of the slack out of the tape if you can, this can be done by applying some pressure on the tape while stretching it out. The wiping down process will be easier if the tape is tighter.
Wiping down the tape is exactly the same as hand taping. Take your 6” knife and pan and wipe down the tape/mud flat.
Screws get 3 coats of mud.
There is 1 technique for spotting screws that will make it a little easier and faster. However, explaining it will be tricky.
You will use your 6” knife for this step. Scrape mud out of your mud tray onto 
Now take your knife sideways and place the bottom of the knife directly below the lowest screw. Then gently push the knife in (against the wall) and slide the knife up simultaneously, the goal being to run out of mud by the time you pass the top screw. It’s kind of like learning how to drive a manual vehicle. The clutch to gas pedal ratio is equivalent to the “pushing in” and “moving up” motion.
Once you get that figured
Now take your knife and wipe the mud down tightly. Don’t leave any “edges” behind, this creates more work. To clarify, an edge can be any amount of mud that does not taper out
flat/smooth against the drywall. Edges equate into more sanding or mud floating.
Screw spotting will not be added to further sections so make sure you don’t forget about it.
Special Note:
**The best case scenario for running corner bead is when the bead is installed “tightly”, meaning that it was pushed tight against the drywall.
To check this (“Knife method” again), take your 10” knife and set it against the corner bead. You will have one end of the knife on the corner of the corner bead (hopefully that wasn’t confusing) and the other end on the drywall. You want to notice the biggest gap between the drywall and the knife. This is how much “fill” will be required on the bead.

If the bead was installed “tightly” there will only be about 1/8” worth of fill required, which is good for only needing 2 coats of mud. If the gap is ¼” or more then you’re going to probably going to need 3 coats.
Also, if the gap is too big you might consider bedding the bead in with quick-set (90 min or 210 min.) because this mud shrinks the least, I would argue that it doesn’t shrink at all.
This will accomplish 2 things:
1) your next coat will require less mud and
2) this will ensure your mud to completely dry overnight whereas pre-mixed mud very likely wouldn’t.**
That was a big “special
Now that you have determined whether to use quick-set mud (if your “gap” was too big) or lightweight mud (if your gap was not too big), get that out and ready. If running light-weight mud, we mix up the mud and add no water. We prefer this thickness because it fills nicely. If you want to add water, don’t add much, start with a ¼ cup. Believe it or not a little water goes a long way with mud.
The knife size varies but you can almost never go wrong with using a combination of an 8” and a 10” or a 10” and a 12”. Beginners should start with an 8” and a 10” because it will be easier. Your 8” knife will be used on the fill coat and your 10” knife will be used on your finish coat. If a 3rd coat is required, use the 10” again or a 12” if needed.

Next, with your knife in hand, put the end of it just above the outside of the mud swipe (drywall side) and wipe the mud in the same direction as the corner bead. This will wipe down the outer side of the mud swipe for you (roughly 2” – ” out of the approximate 8”). Do this for the whole area, and try keep to one continuous flow/motion as best as possible.
Next take he whole knife,
When the mud is dry, rinse and repeat for he remainder of the coat(s). Make sure to use the 10” knife from here on out.
Don’t leave any “edges” behind, this creates more work. To clarify, an edge can be any amount of mud that does not taper out flat against the drywall.
They equate into more sanding or floating them out with mud. Running corner bead will not be added to further sections so make sure you don’t forget about it.
All corners that are not 90 degrees will get flex tape. This includes inside and outside corners. Most of these angles will be 120 degrees but not all of them. I run these with an 8” knife and prefer to use thicker All-Purpose mud for the taping portion. I actually do not add any water to my mud for this part because I’ve found the stiffer mud will help keep the tape in place.

Flex tape can be a little tricky to work with because of its stiffness. It comes in a flat roll like paper tape but has a crease down the middle. First, find the length of tape you will need and cut it off of your roll. You can use tin snips or a utility knife.
Next, take the tape and bend it down the crease, make sure you bend it a little more than the angle that will be required.
At this point you can apply the mud with your 8” knife like you would on a regular angle.
Now apply your tape and push it into place with your fingers. Make sure it’s pushed in tight and not bulging out. Then take your knife and wipe down the outsides, and come back and wipe down the whole thing.

If your tape coat doesn’t fill that well, go ahead and apply more mud with your 8” knife and then wipe it down like you would with corner bead.
If the tape only protrudes on top of the drywall roughly 1/8” on both sides (which it should) then you can float out the butt joint evenly with a 10” knife on both sides. If it’s more than that or if one side is more than that, then you will need to use 3 swipes.
With a knife full of mud, set the left side of the knife on the center of the tape. Push the knife in and move it down simultaneously to apply the mud. Once you have this side covered in mud do the other side the same way.
You want the thickness
At this point you should have a span of mud roughly 19” -20” wide and as long/tall as the seam itself. The span of the mud should be centered on the tape seam.
Next, take the right side of your knife and place it just above the right side of your mud. Pull the knife down to the bottom of your seam, smoothing out roughly 5” – 7” of the outer part. Repeat this process for the left side.
Now, this is where taping gets serious, take your knife nd center it just above the center of where your tape is. Pull the knife down with even pressure across the blade. The trick is to get the whole knife blade to pull evenly downward through the whole seam, mimicking a straight edge.
You will notice 2 ridges, one towards the left side of the seam and one on the right side of the seam.
At this point if everything looks fine, go to the next one. If you see suite a few deep gouges, trenches or low spots then run the seam again. If the seam just doesn’t look right, run it again. If there are just a few imperfections then you can move on but remember them later, mark the side of the butt joint with your pencil.
The thickness of this coat should be just a tad more than 1/8” just to cover the tape, unless it requires major floating. In which case the depth above the tape would be the same but the “floated out” areas may be deeper.
These joints will be fairly easy as long as the drywall seams are sitting flat. Again, do your “knife check” every so often to see what you’re working with.
The tape should not be touching the bottom of the blade, this will indicate a seam that only needs to be filled, not floated. However, if the tape does protrude out past the drywall causing the knife to rock back and forth, you will have to run this seam like a butt joint.

If the tape did not touch the bottom of the knife, then run this seam with one 10” swipe. It is better to apply and wipe the mud in longer runs for this coat. This reduces the disturbance marks from the knife being set onto and lifted away from the mud.

The mud is wiped down the same way as before. Wipe down 2” – 3” on one side of the swipe with the outside of the knife, then do the other. Now wipe down the middle with even pressure on the blade. If there are ridges present, wipe them down with two more knife passes, and make sure
your knife is centered on the ridges. Also, make sure not to apply too much pressure or you will wipe out all of your mud. Do the “knife check” to verify. If the knife “rocked” on the tape then go back to the Butt Joint section.

Typically, angle seams only need 2 coats of mud per side. One from the tape coat and then one more
coat. As long as you got a good fill on your tape coat his will hold true. If there are a lot of bare
spots and ridges then you may need an extra coat or extra touching-up.

You will run your angle seams 1 side per coat. So, for the bed coat you will run one side, for the finish coat you will run the other side.
No “knife check” will be needed for these seams. Get out your 6” knife again and apply the mud semi-evenly down the seam. Stick to the same rules of applying mud as we discussed before. In this case it will be roughly 6” wide and about 2 – 3 times the thickness you actually need.
Take the outside of your knife and wipe down the outside 2” – 3” of your swipe.

Then take the corner of your knife and set it into the corner of the seam and smoothly pull it as far as you can. If you have a ridge, put the corner of the knife in the corner of the seam and pull it through one more time.
Make sure the areas where the angles run into each other get special care. They are the hardest part to running angles.

There could be some trouble areas that should be floated out further, this includes butt joints if needed. Look for them by doing the “knife check” and also do what I call the “blind check”. The “blind check” is done by closing your eyes and running your hand over the seam, back and forth. You will feel humps or low spots if there is any.
Mark each trouble spot with
Some trouble areas and/or seams will require more or less floating. You will have to check this by using the “knife check” method, the “blind check” method or by using some sort of straight edge (like a level). You will have to determine how much “floating” is required after doing the checks.

This is by far the toughest part of drywall finish work.
I mentioned previously in this manual that we do our finish sanding with a sanding sponge. I also mentioned that most fellas could call me crazy in regards to this so you will have to decide for yourself. Either way use a fine grit sanding block or 220 grit sanding paper.
There are also electric disc sander options out there, some come with vacuums for “dustless” sanding. These systems are expensive and not worth the cost unless you are going to be doing this all day every day. It is also my opinion that imperfections in the mud get overlooked by this method.
The decision is yours. You don’t have to stick with one method for the whole thing. For example, if the ceiling will have a heavy texture, you could pole sand it since the imperfections will be covered up. Next, use the sanding block on the wall where the finish will be smooth.
Once you have decided on your strategy, set your bright light to shine down the wall (not at the wall), and start sanding. Look out for scuff marks from your sander. If you start to see scuff marks, change sanders or go to a finer grit.

While sanding, if you see air bubbles, scratch marks, lines or other imperfections, mark them with your pencil, these will later be touched-up with mud. Some of them you might be able to “sand out” as long as you’re not sanding trenches into the mud.
Some touch-ups will require floating while other may just require to be filled then “pulled tight”. You will have to decide this based on what you see.
If you see a touch-up area with sharp edges, sand them down to be rounded. This will fill with mud much easier and may save you from a second layer of touch-up.
When you’re finished sanding and touching-up, take a dust mop and give everything a “once over” to knock off the big lumps of dust. The dust lumps can be problematic for the paint to bond well with the drywall/mud.

Founder, Owner & Operator of Nation's Drywall Repair. Richard has specialized in drywall repair across the St. Louis metro since 2001 — 25 years — and runs the highest-rated drywall repair company in St. Louis. More about Richard & the team →
I appreciate the way you described how you should first call the building department in your area to find out what drywall specifications are needed. Find out what the standard building practices are in your neighborhood even if you are not pulling a permit (in which case do not give them your address). We are making our house more durable so that it will last for a long time over the years, so my husband should think about this. When we find a dependable installer, I’ll make sure to remind him to keep this article in mind so he can follow its instructions correctly.
It always helps to gather information about specifications for projects to make sure it gets done properly the first time, it can be a lot cheaper that way too haha. I’m glad you will find use out of this, feel free to share it with friends. Take care.
This is nicely put. !